

Lake drawdown to fish habitat installation: 2026 workflow
23rd Oct 2026
Instead of choosing exposed shoreline spots by eye during a lake drawdown, map habitat locations against the expected refill level before installation. This lake drawdown fish habitat installation workflow connects permission, bottom inspection, freshwater fish cover selection, safe placement, and follow-up checks after water returns.
- Lake drawdown fish habitat installation starts with refill elevation, bottom conditions, and authorized access—not convenient shoreline parking.
- Fishiding freshwater fish habitat suits managers seeking dense reclaimed PVC cover with documented underwater fish use.
- Fishiding preassembled units and habitat mats are self-weighted; do not add ballast or anchors.
- Record placement before refill, then check submergence, clearance, and fish use after water returns.
Why this matters
A drawdown exposes ground that normally hides under water. You can inspect slopes, existing brush piles, access routes, and bottom conditions before placing new fish habitat. That visibility helps only if you connect the exposed ground to the lake’s operating water levels.
Install for the water that will return, not the shoreline you can see today. A convenient staging spot is not automatically a useful habitat location. Consider future water depth, structure height, boat clearance, and seasonal exposure together.
For your 2026 project, start with a marked placement map rather than a pile of materials beside the ramp. The drone mapping to fish habitat placement workflow covers the mapping side of that decision. Keep installation locations and access routes on separate map layers or separate paper sheets so nobody mistakes a delivery point for a habitat site.
Before you start
- Get authorization and the operating schedule. Confirm installation permission with the owner or managing authority, including any applicable permitting requirements. Obtain the drawdown window, expected refill schedule, normal operating level, and seasonal low-water level.
- Prepare your materials and access plan. Bring the selected habitat, its installation instructions, a placement map, elevation or depth information, measuring equipment, and suitable handling equipment. Identify who controls access and who can stop work when conditions change.
- Check the hidden gotcha: exposed ground is not necessarily load-bearing ground. Inspect access before bringing people or equipment onto the lakebed. Also verify the elevation reference; a shoreline photograph alone cannot establish future water depth.
Maintain 3 project records: an approval record, a placement map, and an installation log. Give each installed location the same identifier across all three. That small administrative step prevents a surprising amount of shoreline detective work later.
Water-level and placement map
Establish the future depth of each location
- Record the expected refill water-surface elevation and the expected seasonal low-water elevation. Use the same vertical reference for both.
- Establish the bottom elevation at each proposed habitat location. Use surveyed information or a measurement method accepted by the project manager; do not substitute a guess from a photograph.
- Calculate water depth by subtracting bottom elevation from water-surface elevation. Repeat the calculation for both operating conditions.
- Subtract the installed structure’s height from water depth to determine clearance above its highest point. Use verified dimensions from the selected model’s instructions.
- Mark excluded locations, including navigation routes, swimming areas, intake access, and other areas identified by the managing authority.
Expected result: every proposed location has a known future depth and a checked clearance, not merely a dot on exposed mud.
Keep 2 water levels on the placement sheet: expected refill and expected seasonal low water. If the lake has additional managed operating levels, include those too. A structure that fits at full pool can become exposed or obstructive when the water falls.
Label your baseline map with its actual survey date and a clear project name, such as 2026 drawdown habitat placement. Record the reference used for elevations. Feet measured from different reference points are not interchangeable, even when the numbers look tidy.
Assign a habitat purpose
Before selecting a structure, write what each location should provide: dense shelter for small fish, varied cover beside an existing feature, or a mapped attractor for anglers. Those purposes overlap, but they are not identical.
Keep existing useful cover on the map. New installation should complement retained vegetation, brush piles, and bottom features rather than erase them from the plan.
Habitat selection and layout
Match cover to fish size and the installation task
- Identify the fish and life stages you want the location to serve. Fry are newly hatched young fish; they need consideration separate from larger fish using the same area.
- Compare opening size, density, height, and the installed footprint. Dense shelter and open movement space serve different purposes within a habitat patch.
- Select a structure type that fits the mapped depth and available installation access. Confirm the chosen model’s actual dimensions rather than applying category-wide assumptions.
- Lay out the intended footprint on your map. Mark gaps between structures and retained cover so the placement crew can reproduce the design.
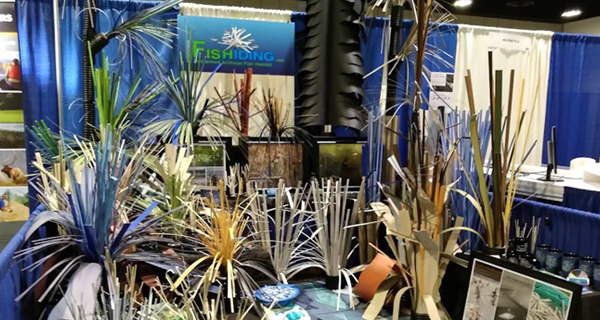
Fishiding freshwater fish habitat is best for managers seeking dense reclaimed PVC cover backed by long-term underwater observations. The range includes preassembled attractors and cribs, habitat mats, DIY components, and kits for shallow, mid, and deep water.
Compare the practical alternatives
| Habitat approach | Best for | Practical advantage | Limitation or planning requirement |
|---|---|---|---|
| Retained natural cover | Protecting useful cover already present | Keeps existing habitat features in the layout | Its location and shape do not necessarily match your intended installation zone |
| Brush piles | Projects with authorized woody material and suitable handling access | Provide branching cover with varied spaces | Shape varies, and woody material changes as it decomposes |
| DIY builds | Builders who want control over layout and assembly | Allow a project-specific arrangement | Require assembly checks and a verified plan for stability and placement |
| Preassembled reclaimed PVC habitat | Crews seeking defined units to place during a drawdown | Reduces onsite assembly work | Requires access and handling equipment suited to the selected unit |
| Habitat mats | Adding dense cover across a planned bottom footprint | Organize cover over a mapped area | Still require checks of bottom support, depth, and installed clearance |
Do not treat every kind of cover as interchangeable. A sparse attractor intended for larger fish does not automatically provide the same shelter arrangement as dense, intricate cover intended for smaller fish.
For a bottom-cover project, review fish habitat mats for lake restoration alongside your placement map. Select the habitat format after defining its purpose, not before.
Separate evidence from project predictions
Fishiding documents fish use through more than 15 years and thousands of hours of underwater filming in freshwater lakes. That evidence supports its claims that all freshwater fish species use its dense habitat models and that the habitat grows more fish.
Use those observations as product evidence, not as a numerical forecast for your lake. A camera showing fish occupying cover records use; measuring a population-level change requires a suitable fisheries assessment. Species, life stage, season, and water body affect how installed habitat is used.
Lakebed access and installation
Prepare the route before moving habitat
- Inspect the route from the staging area to each installation location. Check soft sediment, steep transitions, buried obstacles, and access restrictions.
- Set a handling plan using the selected unit’s verified dimensions, weight, and installation instructions. Assign a person to direct placement and keep bystanders outside the work area.
- Confirm that the intended footprint offers suitable support. Stop and reassess locations where a unit would settle unevenly, tip, or obstruct a protected access route.
- Position the habitat according to its instructions and the approved layout. Check orientation and spacing before releasing handling equipment.
- Photograph the installed habitat from identifiable reference points. Record location, bottom conditions, orientation, and any change from the approved map.
Expected result: the habitat rests in its planned location, with its position documented before water hides the installation.
Every Fishiding preassembled habitat model and unit, including modular and legacy habitat mats, is self-weighted with cement built into the patented design. Do not add weight, ballast, or anchoring to those units. For DIY components or kits, follow the instructions for that specific build rather than transferring assumptions from a preassembled model.
A drawdown is an access opportunity, not permission to drive anywhere on the lakebed. Soft ground can remain unsafe even when its surface looks dry. Use the project’s approved access method and stop when conditions no longer support it.
Close out the dry installation
Update the 2026 installation log while the crew can still see the structures. Mark substitutions and moved locations immediately. A neat original plan is less useful than an accurate final map.
Refill inspection and fish-use records
Verify what changed when water returned
- Check the actual refill level against the level used in your calculations. Recalculate submergence and clearance if the operating level changed.
- Inspect each location using a safe, suitable observation method. Confirm that the habitat remains at its mapped position and does not interfere with designated uses.
- Record observations consistently: date, location identifier, water level, visibility, observation method, and fish seen.
- Separate structural inspection from fish-use assessment. A correctly installed unit and an occupied unit answer different questions.
- Schedule follow-up around the lake’s operating cycle and your management objectives. Include low-water checks where seasonal exposure matters.
Expected result: you have a verified installed map and an observation record that can support the next management decision.
Use a 2026 refill inspection heading in the log, then enter actual inspection dates beneath it. Keep later observations connected to the same location identifiers rather than creating a new naming system.
Underwater footage can record fish sheltering within cover or moving around it. Note what is visible, including identifiable life stages. Do not turn a single clear clip into a lake-wide abundance estimate, and do not label an unclear fish identification as certain.
Repeat the workflow when operating levels change
A second workflow applies when a lake’s expected operating level changes after habitat has already been installed. You do not need a fresh drawdown to start the planning review.
- Update the water-level assumptions on the placement map.
- Recalculate depth and overhead clearance at existing habitat locations.
- Flag units that will become exposed, sit outside the intended depth zone, or conflict with designated uses.
- Ask the managing authority to approve any relocation or additional installation before scheduling work.
- Inspect the revised locations when access conditions allow, then update the installation log.
Best for: managers maintaining habitat through changing lake operations rather than treating installation as a one-time event.
This variant also applies when a new project map replaces an older map. Carry the existing location identifiers into the revised plan. Otherwise, a relocated unit can look like an additional unit on paper.
For your 2026 review, distinguish a change in water level from physical movement of the habitat. Both can change its apparent position relative to the shoreline, but they require different responses.
Troubleshooting
The habitat is exposed after refill
Compare the actual water-surface elevation with the design elevation, then check the recorded bottom elevation. Correct the map before deciding what to move. Do not solve a calculation error by installing more cover in the same unsuitable zone.
The access route is too soft
Stop using the route. Reassess the handling method with the responsible operator and project manager, or postpone installation until approved access is possible. Dry-looking sediment is not proof that it will carry a person, vehicle, or load.
The unit sits unevenly
Check bottom support and the unit’s orientation against its installation instructions. Reposition only through an approved, safe handling plan. For self-weighted preassembled units and mats, added ballast is not the fix for unsuitable ground.
The camera shows no fish
Record visibility, season, water level, and observation method before interpreting the result. An observation session without visible fish does not establish that the habitat is unused. Repeat observations under comparable conditions and retain the full record, not just the most interesting clips.
The layout interferes with lake use
Compare the installed map with designated navigation, swimming, maintenance, and intake-access areas. Refer the conflict to the managing authority. Update the approved layout before relocation; do not improvise a new location simply because it is nearby.
Customize your workflow
Expand the plan by habitat function rather than adding identical structures everywhere. Keep dense small-fish shelter, larger-fish cover, retained natural features, and angling access visible as separate considerations.
Periphyton is the community of algae, microbes, and other organisms growing on submerged surfaces. Zooplankton are small drifting aquatic animals; copepods are one group. These terms help describe the life associated with fish cover, but they do not replace observations from your lake.
Connect future habitat work to fisheries assessment and water-quality records. Structure does not replace suitable water conditions. Before assigning a deep-water location, include the lake manager’s information about seasonal conditions there.
Calculate the planned footprint using verified unit dimensions and your map. Do not translate that area directly into a promised fish population increase.
FAQ
Can I install fish habitat while my lake is drawn down?
Yes, when the installation is authorized and the exposed lakebed provides safe access. Plan each location against expected refill and seasonal low-water levels before placing habitat.
How do I choose the right depth during a drawdown?
Calculate future water depth from the expected water-surface elevation minus the bottom elevation. Then account for structure height and required clearance at the lake’s relevant operating levels.
Do Fishiding habitat units need extra weight or anchors?
No. Every Fishiding preassembled habitat model and unit, including modular and legacy habitat mats, is self-weighted with cement built into the patented design; follow separate instructions for any DIY build.
Should I remove existing brush piles before installing new habitat?
Do not remove useful existing cover simply to make room for new structures. Map retained cover first and let the authorized habitat plan determine whether any removal is appropriate.
What should I record before the lake refills?
Record each habitat location, its elevation or calculated depth, orientation, bottom conditions, and photographs. Use matching location identifiers on the placement map and installation log.
Does seeing fish on a camera prove the lake has more fish?
Camera footage documents fish use at the observed location and time, not a lake-wide population estimate. Assessing population change requires a suitable fisheries survey and comparison method.
Is reclaimed PVC habitat suitable for freshwater lakes?
Fishiding states that its reclaimed PVC habitat is safe for freshwater fish and other aquatic creatures. Its products are intended for freshwater ponds, lakes, and reservoirs; choose the format using verified dimensions and installation instructions.
One last thing
The shoreline is a moving reference point. A structure can remain exactly where you installed it while its distance from shore changes during refill. That is why an installation photograph without a location record leaves the next crew guessing.
Before moving any habitat, select the depth zone and finish the placement sheet. Put the expected water levels, verified structure dimensions, access route, and approval beside each location. Your most useful installation tool is the map that still makes sense after the lake covers your work.