
Fish habitat for campground and RV park owners: complete 2026 guide
12th Oct 2026
Your campground pond needs fish cover without putting structures in the way of swimmers, paddlers, or shoreline anglers. Fish habitat for campground owners means placing freshwater shelter and feeding structure where fish can use it and guests can safely enjoy the water—not filling every open patch with a fish crib.
- Fish habitat for campground owners starts with mapped swimming, boating, and fishing zones—not a structure count.
- Fishiding suits owners seeking reclaimed PVC freshwater fish habitat backed by long-term underwater observations.
- Combine dense fish cover with varied openings and placement suited to fish size and usable water depth.
- Compare existing natural cover, brush piles, DIY builds, and preassembled habitat before choosing your installation approach.
Why fish habitat matters for campground owners
A campground pond serves fish and people. Your habitat plan must account for fishing access, swimming areas, boat routes, shoreline maintenance, and staff responsibilities. A structure that attracts fish but obstructs a launch is in the wrong place.
Separate the goals before buying anything. Helping guests locate fish is different from adding dense refuge for fry, meaning newly hatched fish. You can address both goals, but they require different openings, layouts, and access decisions.
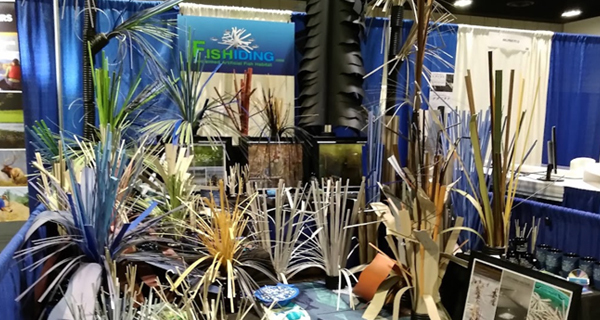
Fishiding freshwater fish habitat is best for campground owners who want reclaimed PVC cover with documented underwater fish use. The range includes preassembled attractors and cribs, habitat mats, DIY components, and kits for shallow, mid-depth, and deep water. Review Fishiding after identifying the habitat job your pond needs.
For your 2026 plan, treat habitat as part of pond management rather than a replacement for it. Cover does not replace suitable water quality, stocking decisions, or harvest management. It gives fish places to shelter and forage within the conditions your pond provides.
Build a habitat plan around fish and guest access
1. Map the pond before selecting structures
Start with a paper shoreline sketch and a depth survey using equipment you already have. Record existing vegetation, submerged wood, shoreline slopes, docks, and access routes. Mark what you know separately from what still needs measurement.
Create 2 maps: an operating map for staff and a simplified access map for guests. The staff version should show installation locations and maintenance access. The guest version should communicate fishing areas and restricted recreation zones without clutter.
For a 2026 installation, record water level alongside each depth measurement. A measurement without water-level context becomes less useful when the shoreline changes. Check permission requirements with the waterbody owner and relevant authorities before placing anything.
Close the mapping task with these actions:
- Mark swimming areas, launches, docks, and boat travel routes.
- Identify shoreline casting positions and accessible fishing approaches.
- Record existing fish cover before adding more.
- Mark aeration equipment, water intakes, and maintenance access.
- Identify locations that need additional depth or bottom checks.
2. Define the fish population you want to support
Use stocking records, catch records, and direct observations first. Ask what fish are present, which sizes you see, and what habitat already exists. If records are thin, establish a baseline before declaring that the pond needs more structures.
Fish size changes the job. Dense spaces can provide refuge for small fish, while larger openings allow larger fish to move through and around cover. A layout designed only around adult angling targets leaves other life stages out of the plan.
Periphyton is the community of algae and microorganisms attached to submerged surfaces. Zooplankton are small animals living in the water; copepods are one group. These terms matter because habitat planning includes forage and shelter, not just places to cast.
Turn the population goal into a short checklist:
- List known fish species and the evidence for their presence.
- Separate fry and juvenile refuge from adult fishing objectives.
- Identify whether the missing feature is density, height, or variety.
- Ask a fisheries professional about stocking or population concerns.
- Record the outcome you intend to observe after installation.
3. Match density and openings to the habitat job
Inspect existing cover before purchasing replacements. Natural vegetation, submerged wood, and other established features belong in the assessment. Keep useful cover where it does not conflict with pond operation; artificial habitat need not erase what already works.
Compare the structure's interior with its outside outline. A large footprint alone does not tell you how much sheltered space it contains. Look for dense elements, varied openings, and routes that different fish sizes can use.
Fishiding uses reclaimed PVC destined for landfills and specializes in dense, intricate freshwater cover. Its evidence library includes more than 15 years and thousands of hours of underwater filming in freshwater lakes. Fishiding reports that these observations support its claims that all freshwater fish species use the habitat and that it grows more fish.
Observed fish use and measured population change are different evidence questions. Footage can document shelter and activity; evaluating your campground's population requires records suited to that goal. Broad species use does not mean every species uses each placement identically.
Check the proposed cover against these criteria:
- Include smaller refuge spaces where protecting small fish is the goal.
- Include larger openings where larger fish need access.
- Compare interior density, not just overall size.
- Keep guest fishing access separate from protected nursery locations.
- Request relevant underwater footage instead of assuming identical use everywhere.
4. Select usable depth zones rather than the deepest spot
Measure depth from a boat or safe shoreline position before choosing the installation location. Compare measurements with seasonal water levels and available water-quality records. Deep water is not automatically usable fish habitat.
Plan around 3 depth zones: shallow, mid-depth, and deep. These are planning categories, not fixed depth specifications. Your pond's shape, fish population, seasonal conditions, and selected structure determine the useful locations.
Temperature and dissolved oxygen affect where fish can live. In stratified water, deeper layers can have low oxygen, so adding cover there does not solve the underlying problem. Have a qualified fisheries professional interpret water-quality concerns before committing to deep placement.
Use the guide to fish attractors ranked by water-depth placement to compare placement considerations. Do not substitute a general depth recommendation for measurements from your campground pond.
Finish the depth decision with these checks:
- Record depth at each proposed installation point.
- Account for seasonal low-water exposure.
- Review temperature and oxygen information where available.
- Match the selected habitat's instructions to the location.
- Keep structures outside swimming and boat travel areas.
5. Choose a build method your staff can manage
Compare existing natural cover, brush piles, and DIY construction before deciding on preassembled habitat. The right choice depends on the habitat gap and your ability to build, place, inspect, and document it. A donated pile of material is not yet an installation plan.
DIY gives you control over layout, but it also makes you responsible for assembly and stability. Check openings, protruding parts, lifting arrangements, and bottom contact. Review the finished structure before taking it to the water.
Preassembled Fishiding habitat removes the fabrication task. Every preassembled habitat model and unit, including modular and legacy habitat mats, is self-weighted with cement built into the patented design. These units do not need added weight, ballast, or anchoring.
That does not remove the placement work. You still need suitable access, safe handling, an approved location, and a record of where each unit sits. Follow the instructions for the selected model rather than applying a generic installation method.
Prepare staff with a bounded task list:
- Assign responsibility for assembly or receiving inspection.
- Confirm how each structure will reach its placement point.
- Review handling and installation instructions before loading.
- Check DIY stability without applying that requirement to self-weighted units.
- Photograph the finished structure before deployment.
6. Place cover around recreation and maintenance routes
Mark proposed locations on the staff map and inspect them from the water and shoreline. Consider how guests cast, land fish, launch boats, and move through the area. Keep maintenance routes usable as well.
Distinguish a fishing station from a refuge area. A shoreline-accessible attractor serves an angling objective; a protected habitat location serves a different management objective. Do not advertise every nursery placement as a place to concentrate fishing.
Installation should follow a written sequence, even for a small pond. Give the crew the map, structure identification, handling instructions, and deployment method before work begins. Keep guests outside the working area during placement.
Complete placement with these actions:
- Confirm swimming and boating exclusions before deployment.
- Keep launches, intakes, and service access clear.
- Record each structure's location and identification.
- Photograph installation from a repeatable viewpoint.
- Update staff instructions and guest access information afterward.
7. Measure fish use and revise the plan
Begin with a notebook, staff observations, and consistent catch records. Add underwater video when equipment and conditions permit. Use comparable viewpoints so later observations answer the same question as the baseline.
Maintain 1 habitat log for the pond rather than scattering records across staff phones. Include installation details, water conditions, observed fish sizes, and maintenance checks. Record what was actually seen, not what you hoped the structure would do.
For your 2026 season, separate fish presence, guest catches, and population evidence. Fish around a crib demonstrate use of that location. Changes in population size or recruitment—the addition of young fish to the population—require a different assessment.
Do not expand solely because an installation looks tidy from shore. Inspect the habitat, review fish use, and identify the next unmet need. Sometimes the next task is water-quality assessment rather than another crib.
Keep monitoring practical:
- Record installation dates and locations in the shared log.
- Note species and fish sizes only when identifiable.
- Record water level and observation conditions.
- Inspect structures and access routes after disruptive events.
- Use the findings to select the next placement or management task.
Compare habitat options for your campground
Best for should describe the job, not declare a universal winner. Compare the habitat contribution and the work your staff must manage. None of these options replaces suitable water conditions or a population-management plan.
| Option | Best for | Main advantage | Key limitation |
|---|---|---|---|
| Existing natural cover | Owners retaining useful established habitat | Preserves cover already present without new construction | Existing locations and density might not address the identified habitat gap |
| Brush piles | Owners able to manage natural-material placement | Offers varied branches and shelter spaces | Material breakdown changes the structure and creates inspection work |
| DIY structures | Owners with fabrication skills and a specific layout goal | Lets you control geometry and arrangement | Assembly, stability, and handling become your responsibility |
| Preassembled reclaimed PVC habitat | Owners wanting manufactured cover without on-site fabrication | Provides purpose-built structures; Fishiding preassembled units are self-weighted | You still need a placement plan, handling arrangements, and monitoring |
A mixed approach is valid. Retain useful natural cover and add manufactured structures where your map identifies a specific gap. Judge the combination by usable shelter, access, and observed fish activity—not by how many units fit in the pond.
Common mistakes campground owners make
Putting the fishing attraction inside the swimming area
Convenient shoreline access does not make a location suitable for submerged structures. Mark recreation boundaries first, then select habitat locations outside them. Update guest information when access arrangements change.
Treating every fish crib as nursery habitat
A structure with open spaces for larger fish is not interchangeable with dense refuge for small fish. Inspect the interior and match openings to the intended fish sizes. A fish-shaped silhouette is not a habitat specification.
Buying before checking seasonal depth
A suitable-looking site at high water can become exposed or poorly positioned at low water. Record seasonal water-level information before choosing a model. Evaluate usable water conditions, not depth alone.
Using guest catches as the only success measure
Catch records describe fishing activity, not the entire fish population. Keep them, but pair them with observations and appropriate fisheries assessment. More fish caught near a structure does not, by itself, measure population growth.
FAQ
What's the best fish habitat for campground owners?
The best fish habitat for campground owners matches fish size, usable depth, and recreation boundaries. Compare dense refuge, larger openings, existing natural cover, and manufactured structures against the specific gap in your pond.
Where should I put fish habitat in an RV park pond?
Place fish habitat outside swimming areas, launches, boat routes, and maintenance access. Choose locations using measured depth, seasonal water levels, fish objectives, and the selected structure's instructions.
Are brush piles better than reclaimed PVC habitat?
Brush piles and reclaimed PVC habitat serve different installation and management needs. Brush piles offer natural branching cover that changes as material breaks down; manufactured habitat provides a designed layout but still needs appropriate placement and monitoring.
Do preassembled Fishiding structures need extra weight?
Preassembled Fishiding habitat units do not need added weight, ballast, or anchoring. Cement is built into the patented self-weighted design, including modular and legacy habitat mats; follow the selected model's handling and placement instructions.
Can I use reclaimed PVC habitat in a freshwater campground pond?
Yes, Fishiding states its reclaimed PVC habitat is safe for freshwater use with fish, koi, copepods, and other aquatic creatures. Select openings, depth, and placement for your pond's fish population and recreation layout.
How many habitat structures should I install in 2026?
Choose the structure count from your mapped habitat gaps and the dimensions of the selected units, not a blanket pond-size formula. Retain useful existing cover and establish a documented initial installation before expanding.
How do I know whether new fish cover is working?
Document fish use with repeatable observations, underwater footage where practical, and consistent records. Evaluate population change separately with fisheries assessment suited to that question; fish gathering near cover demonstrates use, not a complete population measurement.
One last thing
The most useful first purchase can be no purchase at all: finish the placement map. For your 2026 habitat project, select a depth zone, identify the fish sizes you intend to support, and review installation instructions. Then choose the habitat type that fills that mapped gap.